
A friend commissioned me to make a gift for her daughter who graduated from high school a few weeks ago. Yes, "graduate-d." I missed the deadline a bit. But still, she hasn't started college yet so it's still good. Isn't that in the etiquette books somewhere?
In any case, it took me a long time to decide what to do. When I'd asked my friend whether she wanted me to hand-dye something or quilt something, she said, "Whatever you want to do!" So, as it turned out, I did both. This projects is done on my hand-dyed fabrics, and its quilted. To within an inch of its life, actually.
I decided to do a word quilt. I chose a Scripture that felt to me like it fit her daughter, who is a tremendous vocalist, planning on continuing music in college, and whose faith is very central to her life. Since I didn't have it in me to do a lot of words, I just cited the verse. I thought it might be a little intuitive, anyway, since it'll make people have to go look it up. I'm a teacher at heart, I guess. That's my story and I'm sticking to it.

I started out by using a new product: Sticky Fabri-Solvy.
I. Love. This. Stuff.
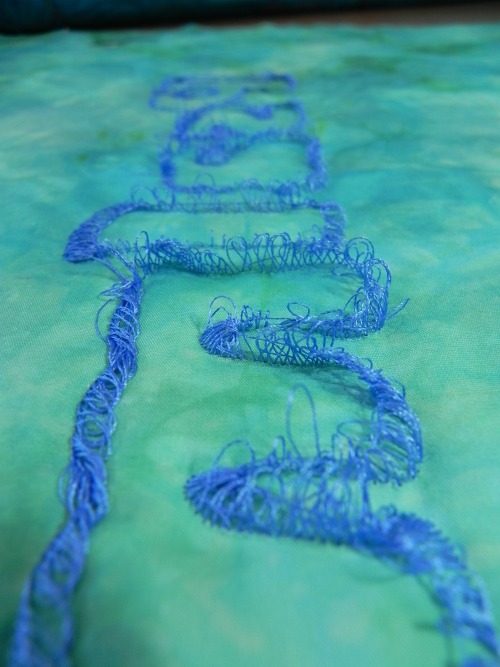
This photo is from my test sample--I kicked up the contrast in the photo so you could see it well enough. You can run Sticky Fabri-Solvy right through your printer. So after I designed my lettering in some software or another, I just printed it right off on the stabilizer. I didn't have to reverse it or anything, because it has a paper backing that I peeled off and it adhered to the right side of my fabric. I then stitched around the design, and soaked the stabilizer off the fabric. Easy Peasy.
I decided to do it that way after my chalk-stencil method was a big fat fail (the chalk wouldn't stay in place long enough for serious stitching); and this was just so much faster. And, to be honest, I wanted to play with the stabilizer to see how it worked. The test sample worked beautifully, so I went right to work on the real thing. After I soaked the stabilizer off, I put my quilt sandwich together and then just outline-stitched the lettering again. That also gave the letters two thicknesses of thread/outline, which helped set it off even more.
I did have a bit of a glitch at that point.
I'd practiced on a test sandwich to set my tension and everything--it was all working beautifully.
I started stitching away on the real thing and it all felt like it was going swimmingly. I'd flipped up the back and checked after the first half inch of stitches or so, and it looked fine.
I should've paid more attention to how the bobbin was sounding. Something got unhooked somewhere and chaos was breaking loose on the back. I didn't see it until I came to the end of the word. Out came my new electric seam ripper. And then the Havel. And then my traditional seam ripper. Eventually, between the three of them, I did get it all undone. (Each seam ripper has its special gifts!)
That being said, that was really the only major snafu in the whole project. Everything else went pretty well, given how many new-to-me techniques I was throwing in this thing.
Free-motion feathers, using techniques I learned from Ann Petersen.
Background quilting circles and straight lines--the straight lines particularly being a design thought I got from Cindy Needham.
Shiva Paint stick highlights--it's been awhile since I got to play with my paint sticks and I haven't used them on a quilt like this ever.
Metallic thread--which I haven't used in probably over 10 years.
And bling. I've never blinged before. What a hoot.
And so...the end result. (Drum roll please.....)

Psalm 98 quilt complete. Approx 14'x16".
And, because it's hard to see the sparkle in that lighting...

(Actually, the picture above is also the result of what I've been learning in my Craftsy photography class. To try to get the sparkle to show, I worked with some settings I recently learned that I have on this camera. But more about that class in a different blog post.)

Can you see the metallic thread outlining the feathers in this picture?
It's subtle, but it's there.
I'll probably talk more about this in my podcast episode this week (which, as of this writing, hasn't been recorded yet). I'll talk about using that metallic thread, especially, and some other slight hiccups along the way, and what I did about them.
So, there it is. Of course, as I look at it, I see all the things I'd have liked to have done better. But it's done, and it's not bad, and I think both the mom and daughter will enjoy it. And I had fun doing new stuff. Though, admittedly, it'll be awhile before I'm ready to sit down and stitch little bitty circles and very-close-together lines again.